BUTTERFLY FACE PAINT DESIGN
If you’ve ever seen a professional face painter in action, you’ll know that it’s an art form. It takes skill and practice to master the perfect butterfly face paint design, but anyone can do it with the proper technique and a little bit of practice. Luckily for you, we have all the tips and tricks you need to become a pro at creating butterfly face paint designs. Whether you’re brand new to face painting or want a refresher on creating the perfect butterfly design, this guide will help you get started in no time..
YOU WILL NEED
Before starting your butterfly face paint design, ensure you have all the necessary supplies.
A clean, well-lit workspace
A disposable surface to protect your workspace
A mirror for easy visibility
Smock or apron to protect your clothes
Disposable gloves for cleanliness
You're ready to begin when you’re sure you have all the necessary tools!
CLICK HERE TO DOWNLOAD BUTTERFLY STEPS
BUY FACE PAINT
LEARN MORE ABOUT FACE PAINT

STEP ONE | CREATE YOUR BUTTERFLY COLOURS
For the best results, ensure the sponge is damp before creating the face paint design. This will give you a better finish and make it easier to control the sponge. Using the sponge from the set, paint two-thirds of the sponge with white face paint and then add yellow, blue, and red face paint stripes. *tip use the flat brush to get straight lines

STEP TWO | BUTTERFLY WINGS
Start by gently sponging the outside edges of the eyes, then the cheeks and under the eyes, using an even and balanced amount of face paint from the sponge. Ask your subject to keep their eyes closed while you paint near or on the eyelids. You should be able to get four stamps of colour out of your loaded sponge for your butterfly wings design.

STEP THREE | BUTTERFLY WINGS OUTLINE
Outline your butterfly wings with a black from your face paint set. This will make the design pop against your skin. When outlining your butterfly face paint design, Load a round brush with black and paint the outline of the butterfly wings as shown in the picture.

STEP FOUR | CREATE THE BODY OF YOUR BUTTERFLY
If you’ve made it this far, your butterfly wings should be fully dry. If not, you should put off creating the body of your butterfly until they are. Load the liner brush (from the brush set) with black and paint the body and butterfly antennae in the middle of the forehead.

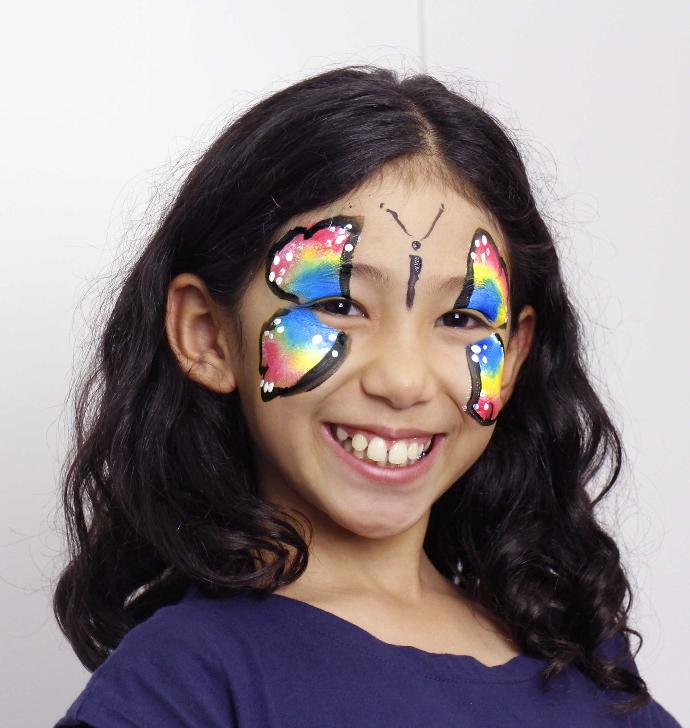
STEP FIVE | FINISHING BUTTERFLY TOUCHES
After you’ve finished creating your butterfly face paint design, it’s time to add the finishing touches. To do this, You can now finish off your design by using the end of the brush handle to paint white dots to add some fun white spots on the wings. Use the end of the brush like a stamp, dip in the white face paint and stamp some extra white detail to make your Butterfly facepaint design pop.
