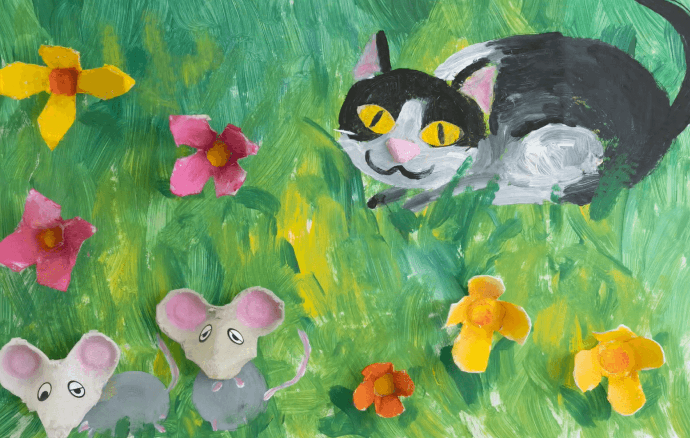
CHILDREN'S PAINTING PROJECT | CAT AND MOUSE
If your looking for a new way to up-cycle your egg cartons and have fun with the kids, here is the perfect project. This magic garden with a cat and a mouse project is easy and fun. This project is the perfect way to inspire creativity using household items
You will Need
A clean, well-lit workspace
A drop cloth or newspaper
A Cardboard Box
1 empty egg carton
Challenge Acrylic Paints - Yellow, Red, Orange, Blue, White and Black
a palette or plate
Scissors or box cutter

STEP ONE | PREPARING YOUR COLOURS
To begin your garden and prepare your pallet, put some green, white, yellow and a small amount of blue paint onto a paper plate.

STEP TWO | CREATING YOUR BACKGROUND
To create a background for your garden begin by covering your page with upward strokes of green paint. Small amounts of blue, white and yellow can be added to create depth by making darker or lighter hues of green.

STEP THREE | CUTTING OUT THE MOUSE
Cut out two egg holders from your egg carton using scissors or a box cutter, as seen in the image.

STEP FOUR | CUTTING OUT THE CATS NOSE
Then, cut off the end of one of the spikes on the side of the carton as seen circled in the photo, and trim this to create a 3D triangular shape

STEP FIVE | CUTTING OUT CAT EYES
Use a pencil to create two eyes by outlining two oval shapes on a flat section of the carton, and then cut these out.

STEP SIX | CUTTING OUT FLOWERS
Cut out a spike from the egg carton without removing too much of the surrounding cardboard. The four sides that make up the spike can be shaped to the desired length and shape, such as rounded or pointed, which will later make the petals of flowers.
This can be repeated to create various flower sizes and shapes.

STEP SEVEN | MAKING FLOWER PETALS
Use the box cutter to cut a line most of the way down all four sides of the spike without fully separating the sections. This should create a flower-like shape with four petals.

STEP EIGHT | PAINTING THE MICE
Mix white and a small amount of red paint to create a light pink colour, and apply this to the two round areas attached to the spike that was cut out earlier.

STEP NINE | MICE DETAILS
Use either eye stickers or paint to add eyes to either side of the spike, creating an adorable mouse face.

STEP TEN | PAINTING YOUR FLOWERS
Using pink paint created with red and white, cover the inside and outside of the petals of one of the flowers created earlier. A touch of yellow in the middle where the petals meet can add some detail.

STEP ELEVEN | PAINTING MORE FLOWERS
You can repeat this flower painting process with a range of colours to create contrast and interest within your design.

STEP TWELVE | PAINTING CAT FEATURES
Using yellow paint, colour the two eye shapes cut out earlier.
Using the pink paint, colour the 3D triangular shape cut out earlier.

STEP THIRTEEN | CAT EYE DETAILS
At the centre of these eye shapes, paint vertical stripes with black paint to create pupils for the eyes.

STEP FOURTEEN | DRAW YOUR CAT
Place the eyes and pink triangular shape onto the page and organise to create two eyes and a nose. Position these where you would like them, and create an outline of a cat with a pencil around these features. This cat can be made by simply drawing a circle around the face, a connecting larger oval for the body, and then two triangles from the head to make ears and a tail.

STEP FIFTEEN | OUTLINING YOUR CAT
Using black paint, outline this cat shape, removing the eyes and nose once the body has been outlined.

STEP SIXTEEN | PAINT YOUR CAT
Using black and white paint, grey paint can be mixed and applied around the body where it connects to the head to show the 3-dimensional nature of the shape. Pink paint can be applied to the ears for a cute touch.

STEP SEVENTEEN | PAINTING YOUR MICE
The technique used for the cat can be repeated for the bodies of the mice by drawing small circles and filling these in with grey paint.
You may also like to use pink paint to create a tail for your mice and add two small pink dots on the body to make little paws.

STEP EIGHTEEN | GLUING EVERYTHING DOWN
Use glue to arrange the flowers, cat features and mice around your garden as you would like.
For more art and craft inspiration, check out our Derivan Art Project page for more suggestions. We are continuously adding new content to this page to give you new ideas for your next project.