MAKE YOUR OWN HANDMADE EASTER BONNET USING CARDBOARD AND PAINT
Looking for a fun and easy Easter craft project that's perfect for kids? Why not try making your own handmade Easter bonnet using cardboard and paint? This unique and creative DIY project is a great way to get into the Easter spirit.
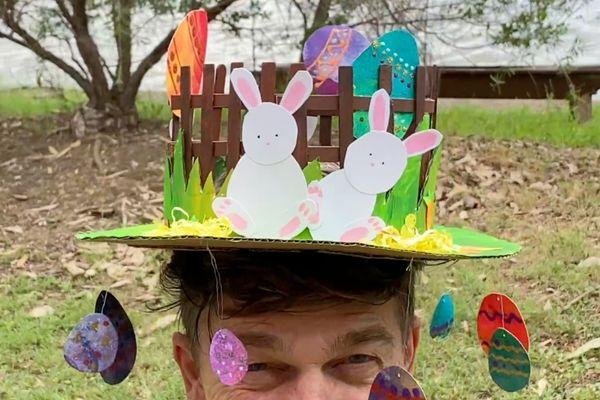
Materials List for DIY Easter Bonnet
Cardboard (large enough to draw circles with diameters of 30 cm and 15 cm)
Pencil
Thumbtack
Scissors
Gel medium (for adhering grass decoration)
Derivan student acrylic colours: fluro green, green deep, yellow deep, fluoro pink, white, red oxide, and burnt umber
Paintbrushes
Paddle pop sticks (for fence pailings)
Thin cardboard strips (2 pieces, each 30 cm long)
String for creating circles
EASTER BONNET TUTORIAL STEPS

STEP 1 - DRAWING A 30 CM CIRCLE
Using a pencil, draw a 30 cm wide circle on the cardboard. To do this, attach one end of a piece of string to a thumbtack placed at the center of the cardboard, and create a loop at the other end to hold the pencil's lead. This will help you draw a perfect 30 cm circle with ease.

STEP 2 - CUTTING OUT THE CIRCLE FOR YOUR DIY EASTER BONNET
Use scissors to cut along the outline of the 30 cm circle you drew on the cardboard. This will form the base of your DIY Easter bonnet.

STEP 3 - DRAWING A SMALLER CIRCLE INSIDE THE CUT-OUT
Using the same thumbtack and string technique, draw a smaller circle with a diameter of 15 cm inside the cut-out circle. After drawing the inner circle, carefully use scissors to cut it out. This will create the brim of your DIY Easter bonnet.

STEP 4 - CREATE THE GRASS DECORATION FOR YOUR DIY EASTER BONNET
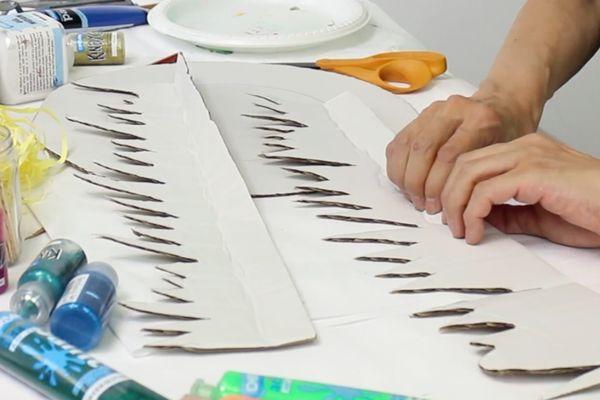
Cut a 30 cm long piece of card and draw a jagged line along its length to resemble grass. Then, carefully use scissors to cut out the jagged grass pattern. This will be used to decorate the edge of your Easter bonnet.
STEP 5 - PREPARING THE GRASS DECORATION FOR EASY ATTACHMENT
Fold the bottom edge of the grass piece up by 2 cm to create a stable base. This will help the grass decoration sit flat on the brim of your Easter bonnet, making it easier to attach.

STEP 6 - CUTTING THE GRASS DECORATION FOR EASY ATTACHMENT
Cut the folded edge of the grass piece at 2 cm intervals along its length. This will allow the grass decoration to be easily wrapped around the curved edge of the bonnet and simplify the attachment process.
STEP 7 - PAINTING THE FOLDED AND CUT GRASS BASE WITH GEL MEDIUM FOR ADHESION
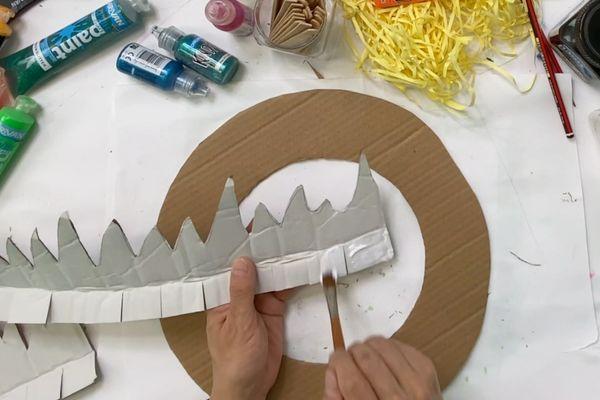
Apply a layer of gel medium to the folded and cut base of the grass decoration, using it as an adhesive. This will make it easier to attach the grass to the brim of the hat you created in Step 3.
STEP 8 - ATTACHING THE GRASS DECORATION TO YOUR BONNET
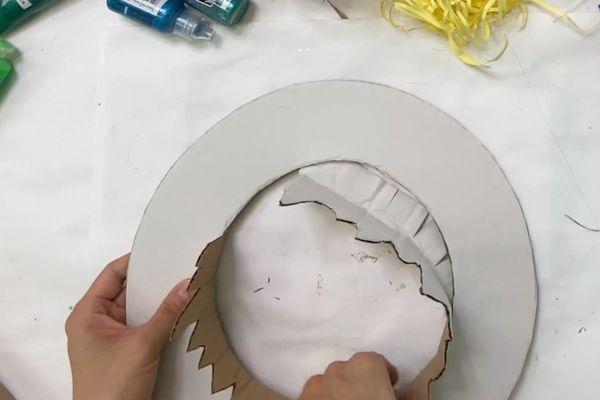
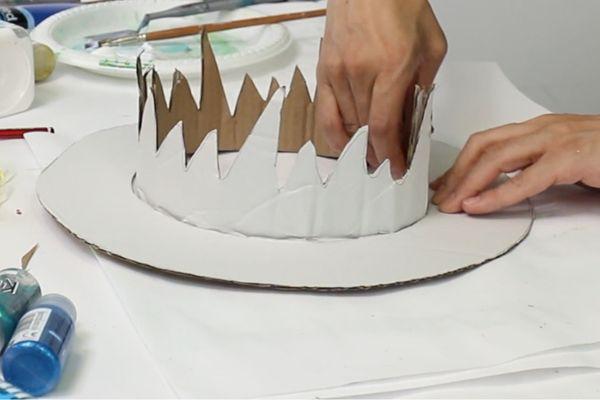
Carefully press the gel medium-coated base of the grass decoration onto the brim of your Easter bonnet, making sure it is aligned and secure. Wrap the grass decoration around the entire brim, adjusting the cuts as needed for a snug fit.
STEP 9 - CHECKING FOR PROPER ADHESION
Examine the side view of your Easter bonnet to ensure the grass decoration is properly adhered to the brim. Make any necessary adjustments to ensure the grass sits evenly and securely around the entire edge of the bonnet.

STEP 10 - PREPARING PADDLE POP STICKS AS FENCE PAILINGS FOR YOUR DIY EASTER BONNET
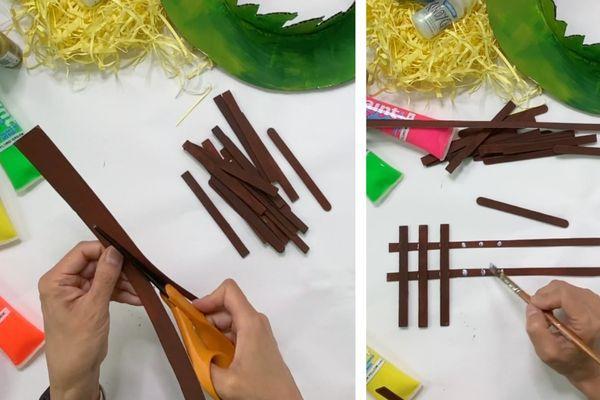
Gather paddle pop sticks to use as fence pailings for your Easter bonnet. Paint the sticks with a mixture of student red oxide and student acrylic burnt umber to achieve the desired colour. Allow the painted sticks to dry before proceeding to the next step.

STEP 11 - PAINTING THE BRIM AND GRASS DECORATION
On a palette, loosely mix Derivan student acrylic colours: fluoro green, green deep, and yellow deep. Use this mixture to paint your Easter bonnet's brim and grass decoration, creating a vibrant and unique look. Allow the paint to dry before moving on to the next step.

STEP 12 - DRAWING AND CUTTING OUT BUNNY SHAPES
To create bunny decorations, draw the following shapes on cardboard: Five big circles for the bunny bodies, ten thin ovals for the outer ears, ten smaller ovals for the inner ears, and ten ovals for the bunny feet. Carefully cut out these shapes using scissors.

STEP 13 - ASSEMBLING THE BUNNY DECORATIONS
Use the cut-out shapes to assemble five bunnies. Attach the inner and outer ear pieces, and then fix the ears to the bunny bodies. Attach the feet to the bottom of the bunny bodies to complete the bunny decorations.
STEP 14 - ASSEMBLING THE FENCE
To create the fence structure, cut two thin pieces of cardboard, each 30 cm long. Paint the cardboard before cutting to make the process less fiddly. These strips will attach the fence pailings (painted paddle pop sticks) around your Easter bonnet.
STEP 15 - CREATING THE COMPLETED FENCE
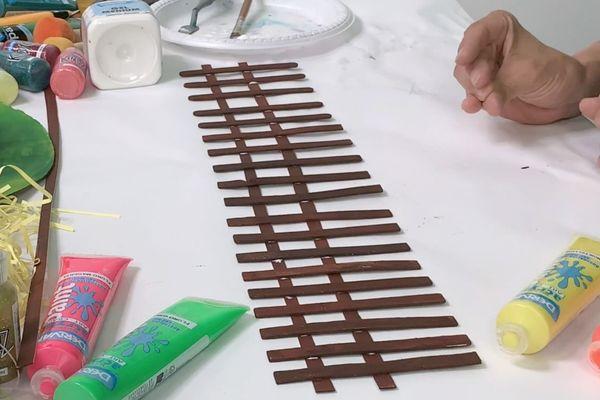
Attach the painted paddle pop sticks (fence pailings) to the painted cardboard strips to form a continuous fence. Space the sticks evenly along the length of the strips to create a balanced look. Once the fence is assembled, allow any adhesive to dry completely before proceeding to the next step.

STEP 16 - PAINTING YOUR BUNNY DECORATIONS WITH A SOFT PINK MIX
Create soft pink paint by mixing fluoro pink and white acrylic colours. Use this mixture to paint the ears and pads on the bunny feet. Add two simple dots to represent the bunnies' eyes. Allow the paint to dry before attaching the bunny decorations to your Easter bonnet.

STEP 17 - ATTACHING THE FENCE TO YOUR DIY EASTER BONNET
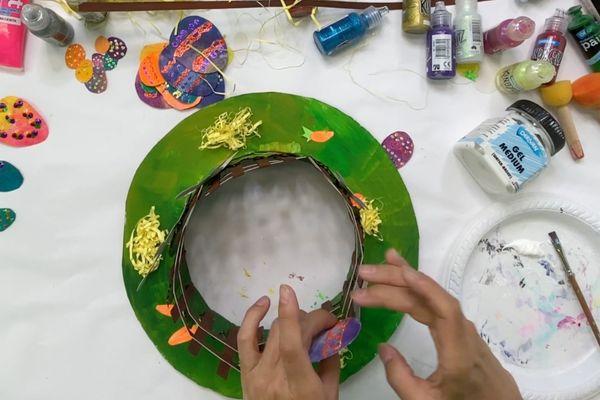
Carefully glue the assembled fence inside the hat, positioning it in front of the grass decoration. Make sure the fence is securely attached and aligned before allowing the adhesive to dry completely.
STEP 18 - CREATE ADDITIONAL EASTER DECORATIONS
Now is the time to add extra Easter-themed decorations to your bonnet. Consider creating different-sized Easter eggs, carrots, and shredded paper to make nests for the eggs. Use your creativity to design and add these festive elements to enhance your DIY Easter bonnet.
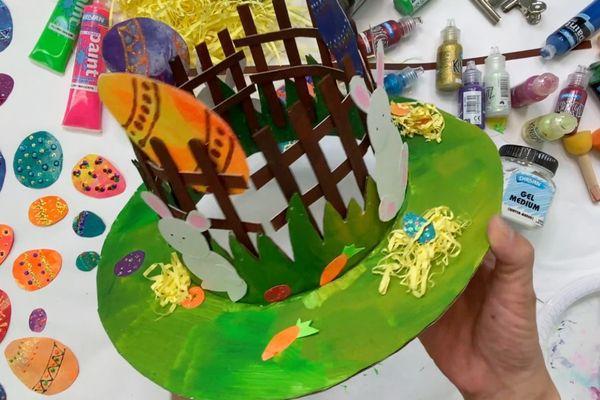
STEP 19 - YOUR COMPLETED DIY EASTER BONNET FOR THE EASTER BONNET PARADE
Congratulations! You have successfully created your unique and festive Easter bonnet just in time for the Easter bonnet parade. Enjoy showing off your handmade masterpiece at the event, and have a fantastic time celebrating Easter!