Step-by-Step Guide to Painting Flowers in Acrylic for Beginners
How to Paint Flowers in Acrylics
Welcome to our comprehensive guide on painting flowers in acrylic, perfect for beginners and seasoned artists! Here, we'll explore easy-to-follow tutorials, expert tips, and essential techniques for creating stunning acrylic flower paintings. Get inspired as you discover the beauty and versatility of painting flowers with acrylics, from delicate petals to vibrant blossoms. Let's dive into the world of acrylic flower art and unleash your creativity!
BUY ACRYLIC PAINTSLEARN MORE ABOUT ACRYLIC PAINTS

Gathering Your Materials for Acrylic Flower Artwork
Before you begin your acrylic flower painting journey, gathering all the necessary materials and preparing your workspace is essential. Lay down some scrap paper to protect your work surface from spills or accidents. Here's a list of materials you'll need to create your stunning acrylic flower artwork:
1 X 9 x 12 inch canvas
Palette or mixing plate
jar of water
a pencil

Step One: Drawing the Flower Outline
The first step in creating your acrylic flower painting is to draw the flower outline. Follow these simple steps to get started:
Draw a horizontal and vertical line to find the centre of your canvas.
Starting from the centre, draw three different-sized circles radiating outward. The circles should resemble a starburst effect and don't have to be perfect. Connect the outer edges of the circles to form the outline of your flower.
This initial sketch will serve as the framework for your painting. Take your time and adjust the size and shape of the circles until you're happy with the overall composition. Once you've outlined, you can start adding colour and texture to your flower.

Step Two: Painting the Background
Now that you have your flower outline, it's time to start painting! In this step, we'll paint the background of the canvas to create a vibrant base for your flower. Here's how to get started:
Using a brush from the Derivan brush set, paint the entire background of the canvas in Derivan Acrylics Lemon Yellow. Be sure to cover the whole surface evenly.
Allow the paint to dry completely before moving on to the next step.
This bright and cheerful background will provide a beautiful contrast to the colours of your flower. Let the paint dry completely before continuing with the next step.

Step Three: Mixing Shades of Pink
With the background dry, it's time to add colour to your flower! In this step, we'll mix up three shades of pink to create depth and dimension. Here's how to get started:
- Prepare a palette or plate for mixing paint.
- Mix up three shades of pink using Derivan Acrylics, Magenta and Titanium White. For the lighter shade, use more Titanium White. For the darker shade, use less Titanium White.
- Make sure to mix the paint thoroughly until you achieve the desired color consistency.
These shades of pink will be used to fill in the circles in the flower outline you drew in step one. The colour variations will add interest and depth to your painting.

Step Four: Painting Radiating Lines
With your shades of pink ready, it's time to start painting the petals of your flower. In this step, we'll use a large flat brush from your Derivan brush set to create radiating lines. Here's how to get started:
- Starting from the outside circle of your flower outline, use the large flat brush to paint lines that radiate outward. Make sure the lines are not perfect and do not touch each other.
- Continue painting more and more lines until you've gone all around the circle.
- Make sure to fill in the entire circle with these lines.
This technique will create a textured effect for the petals of your flower. Don't worry about making the lines perfect; the imperfections will add character and interest to your painting.

Step Five: Painting the Second Circle
In this step, we'll continue to build the texture and depth of your flower by painting the second circle with a medium-toned pink. Here's how to get started:
- Use the same large flat brush from your brush set to paint lines radiating outward from the second circle of your flower outline.
- Be sure to leave some lighter pink from step four peeking through.
- Apply the paint thickly to create a textured effect.
- Use the medium-toned pink to fill in the entire second circle.
This step will add another layer of colour and texture to your flower, making it more vibrant and exciting. Remember to keep the lines uneven and imperfect for a natural look.

Step Six: Painting the Inner and Outer Petals
In this step, we'll start to paint your flower's inner and outer petals using a blend of different shades of pink. Here's how to get started:
I am using a light hand to paint the petals inside the flower, starting with the darkest pink.
Use the same colour to paint the petals in the second circle, starting to blend the pinks as you move outward.
In the outer ring, use Titanium White to break up the pink colour. Apply it lightly, and don't mix it too much. Ensure you can still see a few strands of colour through your brush strokes.
This step will add depth and dimension to your flower, making it look more realistic. Remember to blend the colours for a natural effect.

Step Seven: Painting the Flower Center
In this step, we'll add the finishing touch to your acrylic flower painting by painting the flower centre. Here's how to get started:
Use the smallest flat brush from your brush set to load Derivan Carbon Black paint.
Tap the brush gently onto the canvas to make different-sized marks in the remaining yellow area.
Continue making marks until you've filled in the entire centre of the flower.
This technique will create a textured and natural-looking flower centre. Make sure to vary the size and spacing of the marks for a more realistic effect.

Step Eight: Painting the leaves
In this step, we'll add the final touches to your acrylic flower painting by painting the leaves. Here's how to get started:
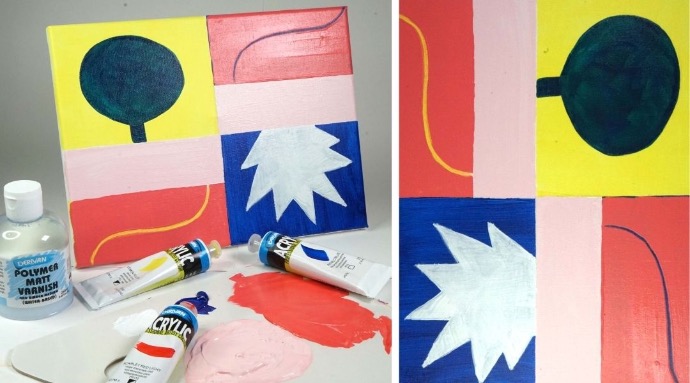
Use the same flat brush from step seven to paint the leaves around the outside of the flower.
If you need help determining where to place the leaves, use this picture as a guide.
The paint from the petals should still be wet, so you'll get some interesting lines and texture as you go. This step will add depth and interest to your painting and balance out the composition. Make sure to vary the size and shape of the leaves for a more natural effect.

Step Nine: Creating Texture with a Palette Knife
In this final step, using a palette knife, we'll add some abstract texture to your acrylic flower painting. Here's how to get started:
While the paint is still wet, use the largest palette knife from the Derivan Palette Knife Set to draw into the flower.
Please pick up a little bit of colour and wipe it on a paper towel, repeating this process to reveal the Lemon Yellow under the paint in the centre of the flower.
This technique will add depth and interest to your painting, creating a unique and abstract texture. Use the palette knife to create different patterns and lines throughout the image, experimenting with varying pressure levels and angles. Once you've finished, admire your beautiful, textured acrylic flower painting!